Writing with a quill pen is an art that dates back centuries. Long before the invention of modern pens, quills were the writing instrument of choice for scholars, scribes, and artists. Despite technological advancements, the quill pen continues to evoke an aura of elegance, craftsmanship, and nostalgia. For enthusiasts of calligraphy, history, or anyone seeking a unique writing experience, learning to write with a quill is a rewarding skill.
This guide will delve into the intricate process of writing with a quill pen, from selecting the right feather to maintaining your quill for long-term use. Whether you are a beginner or have some experience, this article will provide you with valuable insights and tips to master this traditional art form.
History of the Quill Pen
The use of quills can be traced back to the 6th century in Europe, when they were the primary writing tools until the metal nibs came into use in the 19th century. Quill pens were typically made from large bird feathers, such as those of geese, swans, and turkeys. The quill was essential for recording important manuscripts, religious texts, and documents, as its fine tip allowed for intricate, delicate strokes on parchment and vellum.
Famous historical figures like Shakespeare and Leonardo da Vinci would have penned their works with quills, and many ancient scripts were painstakingly written using this humble feathered tool. Despite its simplicity, the quill was capable of producing precise lines and detailed calligraphy that contributed to the beauty of historical texts.
Choosing the Right Feather
Not all feathers are created equal when it comes to crafting a quill pen. Below is a guide to help you choose the best feather:
| Feather Type | Advantages | Disadvantages |
|---|---|---|
| Goose Feathers | Durable, flexible, widely available | Can be bulky to handle for smaller hands |
| Swan Feathers | Strong, thicker, ideal for calligraphy | More expensive and harder to find |
| Turkey Feathers | Affordable, good for beginners | Less durable, shorter lifespan |
| Crow Feathers | Delicate, good for fine writing | Smaller, not ideal for long writing |
Once you’ve chosen your feather, ensure that it is clean, dry, and free from any imperfections. A naturally molted feather is preferable since it will have less wear and tear.
Materials Needed for Writing With a Quill Pen

To begin writing with a quill pen, you’ll need a few basic materials beyond the quill itself:
- Ink: Writing ink, preferably made for dip pens or calligraphy. Avoid ink that is too thick or water-based as it can clog the quill.
- Parchment or Paper: High-quality parchment or paper that has a smooth surface will make the writing process easier. Avoid paper with a rough texture as it can damage the quill tip.
- Ink Pot or Inkwell: A small container to hold your ink while dipping your quill. Make sure it’s wide enough for the quill to dip without hitting the sides.
- Cutting Tool: A sharp knife or blade, often referred to as a penknife, is essential for cutting and shaping the quill’s nib.
- Cloth or Paper Towel: To wipe off excess ink from the quill after dipping.
- Sandpaper or Pumice: These are used to fine-tune the nib of your quill for smoother writing.
Preparing and Cutting the Quill
Preparing your quill pen for writing is a meticulous process, but it is also the most important step in ensuring a smooth and efficient writing experience. Follow these steps to properly cut and shape your quill:
- Heat the Quill: Quills are naturally soft and flexible, so they need to be hardened before use. Gently heat the feather over a flame (from a candle or stove) for a few seconds while continuously rotating it. Be careful not to burn it.
- Trim the Feather: If the feather is too large, you may want to trim it down for ease of handling. Cut off the soft barbs from the feather, leaving enough of the shaft to comfortably hold.
- Cut the Nib: Use a penknife to cut the nib at an angle. The ideal nib should be between 45 and 60 degrees. Make sure the cut is clean and smooth, as jagged edges will result in poor ink flow.
- Create a Slit: The slit in the nib helps control the ink flow. Carefully slice a small slit down the center of the nib using your penknife.
- Sharpen the Tip: Shape the nib by sharpening the tip to a fine point. You can use fine sandpaper to smooth it out.
Mastering Ink Selection
The type of ink you choose plays a crucial role in how your quill writes. Here are some considerations:
- Consistency: Quill pens work best with a medium-consistency ink, neither too thick nor too thin. Calligraphy inks are often ideal.
- Color: While black is traditional, experimenting with colors like sepia, blue, or even gold ink can add character to your writing.
- Waterproofing: If you’re using your writing for important documents or art that will last, waterproof ink is essential to prevent smudging.
When dipping your quill, avoid submerging it too deep into the ink, as this can overload the nib and cause bloating. Dip just enough to cover the slit, then gently wipe off any excess on the side of the ink pot.
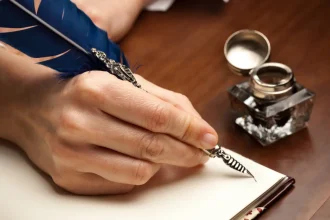
How to Write With a Quill Pen
Writing with a quill pen requires patience, precision, and practice. Here’s how to start:
- Hold the Quill Correctly: Grip the quill like a modern pen, but ensure a light grip. Excessive pressure can damage the nib and produce uneven lines.
- Dip the Quill in Ink: Dip your quill into the ink about halfway up the nib. Remove excess ink by gently wiping it on the rim of the Inkpot.
- Start Writing: Begin with light strokes to get a feel for the flow of the ink. The pressure you apply will determine the thickness of your lines. Experiment with different pressures to control the line variation.
- Control the Flow: Quills hold less ink compared to modern pens, so expect to dip the quill frequently. Keep your movements steady, and avoid pressing too hard, as this can cause the ink to blot.
- Practice Different Strokes: Quills are highly responsive to pressure. Practice both light and heavy strokes to achieve different thicknesses, especially if you’re working on calligraphy or decorative writing.
How to Use a Quill Pen

Mastering how to use a quill pen is as much about technique as it is about care and maintenance. Here are some additional tips for using your quill effectively:
- Position the Quill at the Right Angle: The nib should be at about a 45-degree angle to the paper. This allows for smoother strokes and better ink flow.
- Ink Dipping Frequency: Don’t be discouraged by the need to dip the quill frequently. This is part of the process. Regularly dipping will prevent the ink from running dry and keep your lines consistent.
- Avoid Excess Ink: If you notice too much ink on the quill, tap off the excess on the rim of your inkwell or dab it gently on a paper towel. This helps avoid blotches on your writing surface.
- Practice Makes Perfect: Writing with a quill is not as fast as modern writing instruments. Spend time practicing your technique, and focus on maintaining consistent strokes.
Caring for Your Quill Pen
Proper care is essential for maintaining the longevity of your quill pen. Follow these guidelines to ensure your quill lasts:
- Cleaning: After each writing session, wipe your quill with a damp cloth to remove any residual ink. Avoid soaking the feather in water, as this can damage it.
- Storage: Store your quill upright in a stand or case, making sure the nib is facing downwards to prevent ink from drying inside the slit.
- Re-sharpening: Over time, the nib may become dull. You can use a penknife to re-sharpen it periodically. Sandpaper can also help to keep the nib smooth.
Common Mistakes and How to Avoid Them
Here are some common mistakes beginners make when writing with a quill pen, and how to avoid them:
- Applying Too Much Pressure: A quill requires less pressure than modern pens. If you find yourself pressing too hard, practice holding the pen lightly.
- Overloading the Quill with Ink: Only dip the nib halfway into the ink. If the quill is overloaded, you’ll end up with blotches on the paper. Tap off excess ink before writing.
- Incorrect Nib Angle: Writing at the wrong angle can damage the nib or cause inconsistent ink flow. Always aim for a 45-degree angle to the paper.
Read more: Most Common Mistakes in Writing
FAQs About Writing With a Quill Pen
How long does a quill pen last?
The lifespan of a quill depends on the feather type, how often it’s used, and how well it’s cared for. With regular sharpening and proper care, a goose quill can last several weeks to months of regular use.
Can I use any type of ink with a quill pen?
It’s best to use inks specifically designed for dip pens or calligraphy. Regular fountain pen ink is too thin and will flow too quickly from the quill, leading to blotting. Avoid inks with a high water content.
Is it difficult to learn to write with a quill pen?
While it can take some time to get used to the feel of a quill, especially when it comes to controlling ink flow and pressure, practice makes perfect. Many find that once they’ve mastered it, quill writing becomes a calming and rewarding experience.
Conclusion
Writing with a quill pen offers a unique blend of history, artistry, and craftsmanship. Though it requires patience and practice, the process of mastering this ancient tool is incredibly rewarding. From choosing the right feather and ink to cutting your nib and mastering technique, every step allows you to appreciate the intricacies of traditional writing. Whether you’re using the quill for calligraphy, personal letters, or artistic projects, this guide will help you make the most of your experience and bring elegance to every stroke.